> For the complete documentation index, see [llms.txt](https://apps.sanomads.com/dynamic-checkout-customizer/llms.txt). Markdown versions of documentation pages are available by appending `.md` to page URLs; this page is available as [Markdown](https://apps.sanomads.com/dynamic-checkout-customizer/use-cases/display-tags.md).

# Display Tags

How to add <mark style="color:yellow;">**Custom**</mark> <mark style="color:yellow;">**Tags**</mark> for each cart item on the Checkout using the <mark style="color:yellow;">**Cart Item Details -> Display Tags**</mark> option.

{% embed url="<https://www.loom.com/share/e8348fec89c24ee78b3686427e058f31?sid=a82da4be-d621-45b2-9ce0-56ff285a1a07>" %}
Display Tags Tutorial
{% endembed %}

## Guide

1. Create a new [<mark style="color:yellow;">**customization**</mark>](https://admin.shopify.com/apps/dynamic-checkout-customizer/customizations).

<figure><img src="/files/ckryZ5IcJqvmQHchyT6W" alt="" width="563"><figcaption></figcaption></figure>

2. Select the <mark style="color:yellow;">**Cart Item Details**</mark> category.

<figure><img src="/files/kkOIE9cWVHHXbI2p9HTf" alt="" width="563"><figcaption></figcaption></figure>

3. Select <mark style="color:yellow;">**Display Tags**</mark>, a cart line details type from the options for displaying the custom tags on the checkout for each cart item.

<figure><img src="/files/4bxSH4yxyWbmKykuNVpE" alt="" width="563"><figcaption></figcaption></figure>

4. Select <mark style="color:yellow;">**Render After Each Cart Item**</mark> option from the given placement options.

<figure><img src="/files/qXptcP5CW9JD3VujUKRz" alt="" width="563"><figcaption></figcaption></figure>

5. Add multiple <mark style="color:yellow;">**conditions**</mark> to handle the visibility of the customization on the checkout.

<figure><img src="/files/zhrBamUWVQuAiZGy2YLV" alt="" width="563"><figcaption></figcaption></figure>

6. Adjust the <mark style="color:yellow;">**Display Tags**</mark> settings for the Edit Cart Items customization block which includes conditions for the <mark style="color:yellow;">**product tags**</mark> and their alternate tag values for each cart line item note.

<figure><img src="/files/LDHb6PssdcB1746vF9hJ" alt="" width="563"><figcaption></figcaption></figure>

7. Change the <mark style="color:yellow;">**status**</mark> to active to enable the customization block.

<figure><img src="/files/2BRvVa5aFpNpAWYgc40P" alt="" width="563"><figcaption></figcaption></figure>

8. Adjust the <mark style="color:yellow;">**priority**</mark> between 0 to 100 to cover multiple use cases for the customizations.

<figure><img src="/files/AlKUUwO1vsOKxRqH5H3e" alt="" width="563"><figcaption></figcaption></figure>

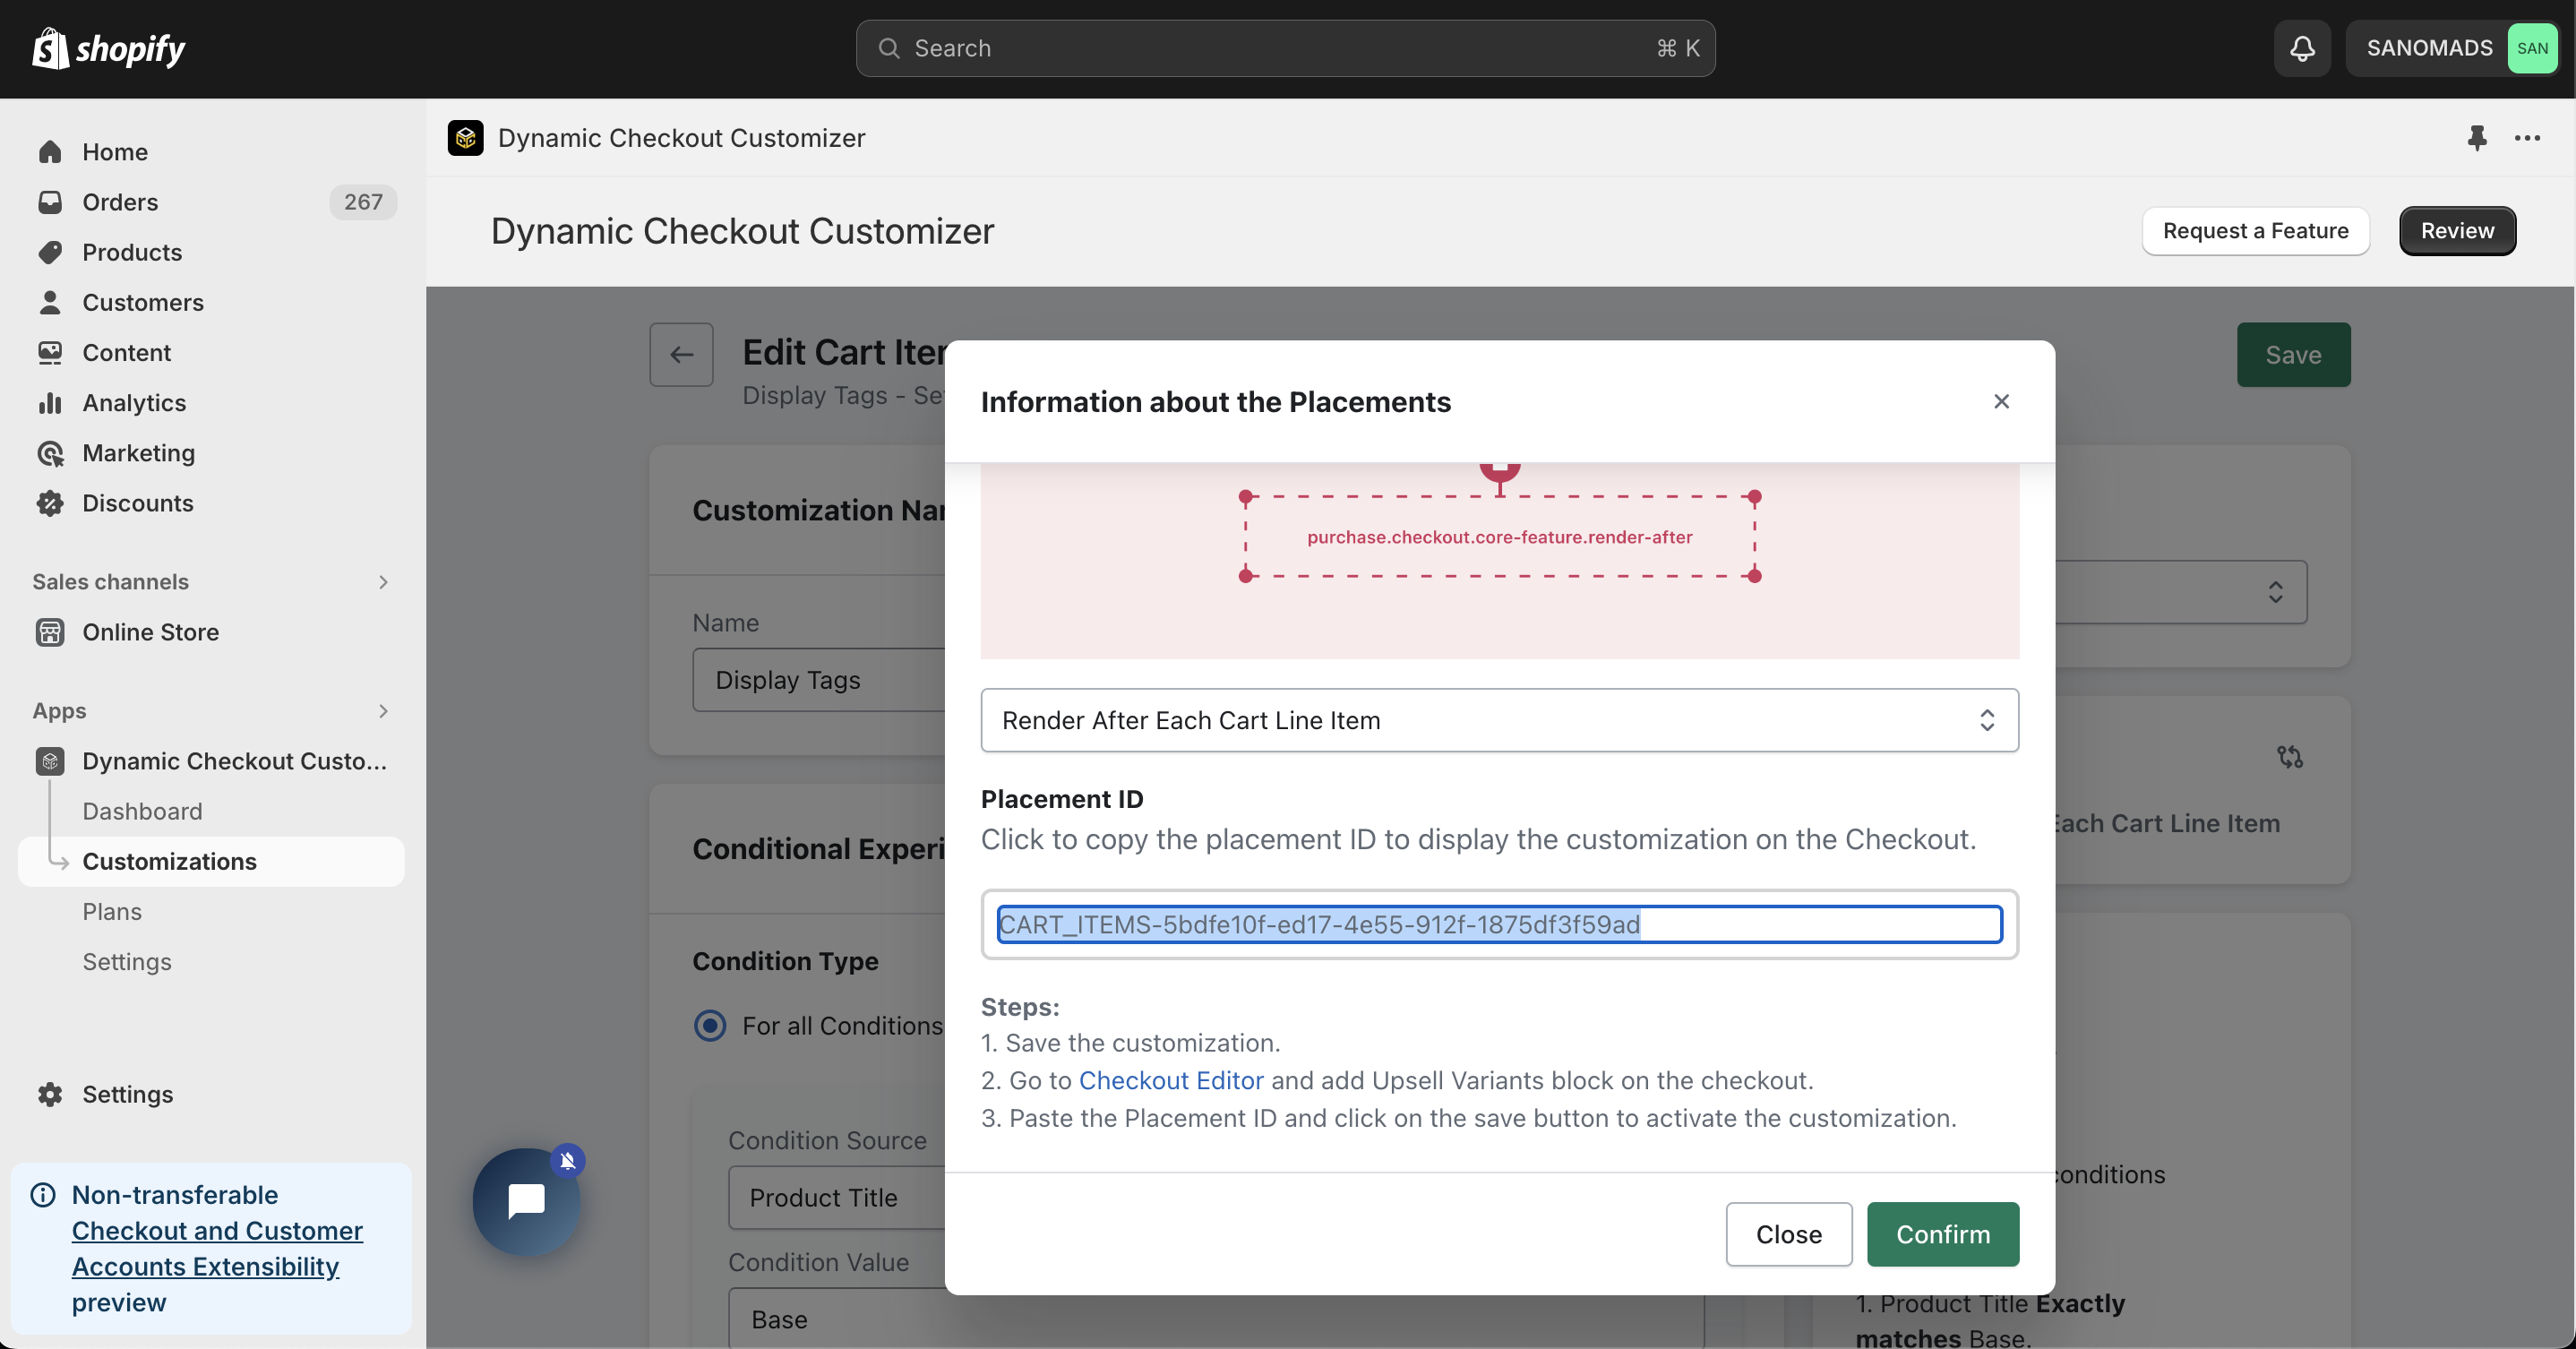
9. In the <mark style="color:yellow;">**placement**</mark> tab, copy the placement ID which will be used on the checkout page.

<figure><img src="/files/tRkAn9iqjjqCCIQSU69D" alt="" width="563"><figcaption></figcaption></figure>

10. Click on the <mark style="color:yellow;">**Save**</mark> button to save the changes.

<figure><img src="/files/jBe4hWu41aoK7VdVl16u" alt="" width="563"><figcaption></figcaption></figure>

11. Go to store [<mark style="color:yellow;">**Settings**</mark>](https://admin.shopify.com/settings), click Checkout and then select a checkout profile and click on <mark style="color:yellow;">**customize**</mark> button to start the customization process.

<figure><img src="/files/QEG4vdai9S6VSPxiiFGm" alt="" width="563"><figcaption></figcaption></figure>

12. In the [<mark style="color:yellow;">**Checkout editor**</mark>](https://admin.shopify.com/settings/checkout/editor), click on the <mark style="color:yellow;">**Add app block**</mark> button located at the bottom left corner of the page.

<figure><img src="/files/dV5yZqmMYcIwNeEJSnqf" alt="" width="563"><figcaption></figcaption></figure>

{% hint style="info" %}
Make sure you that you have placed the app block at the same placement as selected in the app.
{% endhint %}

13. Select the <mark style="color:yellow;">**Checkout - Edit Cart Items**</mark> app block, drag and drop the app block at the desired location and paste the placement ID to view the customization block.

<figure><img src="/files/xDXmKJr8B5KopNtDo2In" alt="" width="563"><figcaption></figcaption></figure>

14. Click on the <mark style="color:yellow;">**Save**</mark> button to publish the changes live for the customers. Refresh the page to view the changes on the checkout page.

<figure><img src="/files/2fMTqi5ie1Taz9R1Ek44" alt="" width="563"><figcaption></figcaption></figure>

## Why does it matter?

[BoutiquesByTheBox](https://boutiquebythebox.com) is using <mark style="color:yellow;">**Cart Item Details -> Display Tags**</mark> customization for displaying custom tags and increased their AOV by <mark style="color:yellow;">**10%**</mark>.